Masssave has a black Friday sale (they're a state company that works on reducing everyone's resource usage, we pay in our taxes). I picked up an ecobee for $14. Hoping it is better than this old ass thermo we have
Finally got the computers set up, had the media center out for Thanksgiving but between cleaning the rental we were in / Getting people from Airports / Festivities / Moving I haven't had much time for anything.
I did do a dungeon err..attic..crawl though to put in a 1 gang old work box in the master and ran some temp network wires to a 3 gang at the media-center / master control area.
Attic was shockingly clean for a 50 year old home. Need to put down some knee-savers in the attic though because crawling through some of those joist triangles was ROUGH on my 6foot and change frame.
Anyone know what size boards (thickness and max width) I should look for in order to span something like a 25 foot length? I don't want to mindlessly put something into a permanent state and I want it to last. Previous owner put up some cheap as fuck ply and it's turning / turned into splinters and dust.
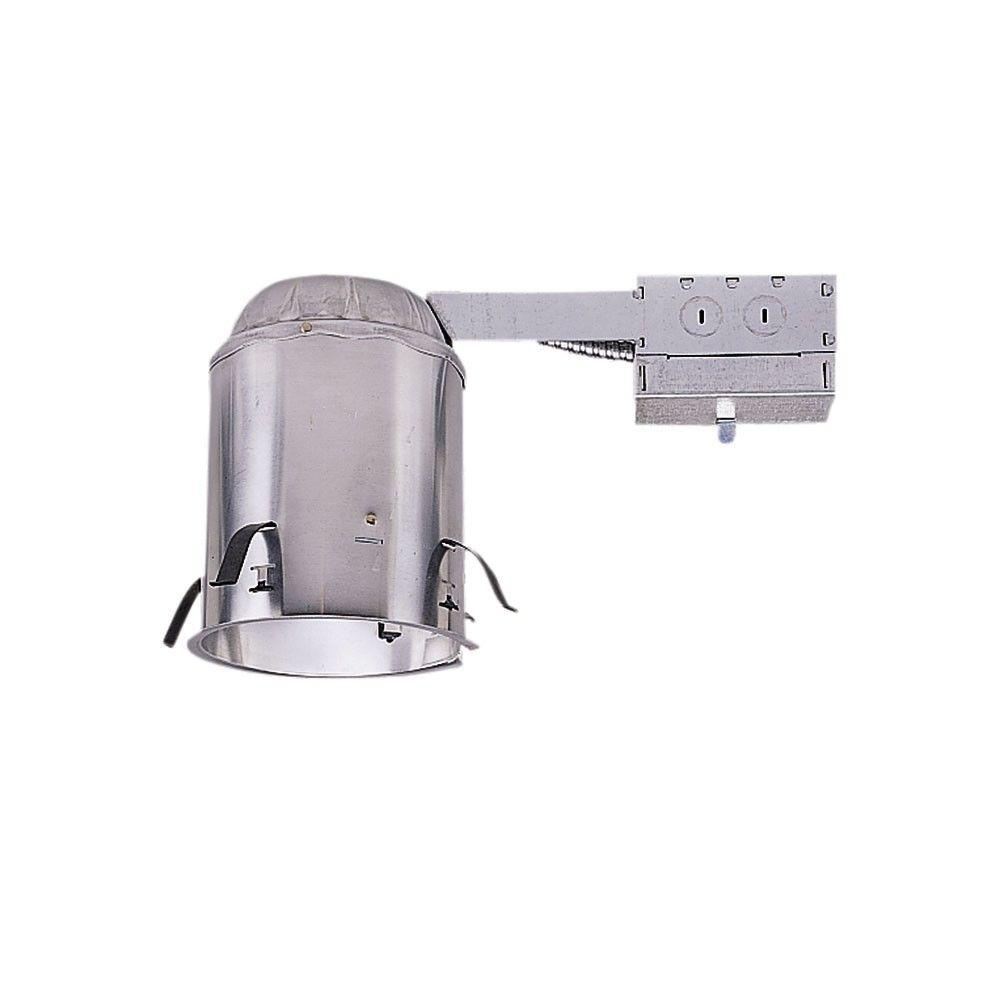
I wanna do canned lighting because current lighting is tubed based on places like kitchen and bathrooms. Question though, is there such a thing as too much can lighting?
I'm thinking of replacing all bathroom lighting with aesthetic lighting and kitchen entirely with recessed, the family room is vaulted but I kinda wanna do canned in there as well.
Attic was shockingly clean for a 50 year old home. Need to put down some knee-savers in the attic though because crawling through some of those joist triangles was ROUGH on my 6foot and change frame.
Yup. That's part of why I don't miss doing that for a living. Trying not to put a foot through a ceiling while crawling around in an attic (especially in the summer when attics are like 130 degrees, at least), getting a million fiberglass hairs all over you so you itch forever, sometimes having to crawl along two joists on your stomach so you can try fishing a wire down on an outside wall in the ">" of the roof pitch...fucking /wrists.
Anyone know what size boards (thickness and max width) I should look for in order to span something like a 25 foot length? I don't want to mindlessly put something into a permanent state and I want it to last. Previous owner put up some cheap as fuck ply and it's turning / turned into splinters and dust.
If it's not a prefab/engineered truss home (doubt it would be at 50yrs old, but whatevs) I'd imagine anything that's 1/2" or thicker. 3/4" plywood might be overkill, though. OSB is probably a cheaper alternative if you want to do a larger area, though I'd go with plywood myself if I had the $$$ to burn. I also think you can find some tongue and groove wood that's on the cheaper side, but probably more expensive than OSB, I'd suspect. But this is assuming you're wanting to run perpendicular to the joists; if for whatever reason you want to run the length of a single joist pocket, you might want to go heavier, or frame some supports crosswise underneath the flooring, the length of that pocket.
I wanna do canned lighting because current lighting is tubed based on places like kitchen and bathrooms. Question though, is there such a thing as too much can lighting?
I'm thinking of replacing all bathroom lighting with aesthetic lighting and kitchen entirely with recessed, the family room is vaulted but I kinda wanna do canned in there as well.
Mmmm...kinda. Depending on your POV, you may want to skip to the TL;DR part below
Electrician answer:
part of it is trying not to put too many can lights on a single circuit, which can be tricky for a homeowner to figure out. Normally you want to do some napkin math on what your ballpark lighting load is. Since we're talking 120v, a single 60w incandescent is going to draw 0.5 amps. If you have a dedicated lighting circuit just for recessed lights, you could hypothetically run ~30ish can lights, but 1) you never want to really use 60w, because future homeowners could install 120w bulbs, and 2) I never really liked to push the limit on circuits, for obvious reasons. If you calculate it at 120w per light, then you're down to 15 cans, and I might personally go to no more than 10 can lights. 10amps is still a pretty decent load on what is probably a 15A circuit, and homeowners don't normally have to consider this, but lights can (should) be considered a 'continuous' load, so pushing your circuit ampacity isn't a fantastic idea (IMHO). It's also not approved of in the NEC, but that's not something that homeowners usually need worry about. 80% of a 15A circuit is 12A, but why even push that limit? FWIW, 'continuous' is 3hours or more of operation at a time, and we all know that most people leave their lights on for more than 3 hours. In a practical sense, if I was ever planning out a lighting circuit and I got close to 12A, I'd just add a 2nd circuit to split the lights and call it a day. It isn't worth doing load calculations and upsizing conductors in Residential.
But it's harder when you're a homeowner and you have no fucking idea how an electrician wired your home, originally. 50yo home? A lot of it is is probably under-wired. You will probably end up with too much on a single circuit, because 50 years ago the loads were so much less. I've seen entire 2nd floors of homes on only 1-2 circuits, whereas I used to run at least 4-5 circuits in newer homes. Unless your home has been remodeled since then, and circuits were added.
TL;DR: if you're just adding a few here and there, and the bulbs are relatively small (I think Lanx
just added 3 or 4 can lights himself) you're probably fine. But if you're thinking about adding 20 can lights then you might want to pare back that number or add a circuit. (I know it sounds crazy, but I've literally seen people add 30+ lights to a circuit when remodeling their dream kitchen themselves, and then they couldn't figure out why their breaker wouldn't hold, LOL)
Now, if you're talking about 'too much' in other terms, you can have it 'too bright', where you regret it afterwards, but it's really hard to tell until they're installed. For most kitchens, I'd say that 5 can lights is probably enough. Anything over 10 is "For the love of God...why?!?". Unless we're talking about mini-cans or something.
Other things to remember: you will be restricted by framing to a certain degree. If you have an attic space above, you can scope that out and plan accordingly. Otherwise, get a stud finder and try mapping out your joist pockets for where you can actually fit the can lights. Also, attic space above makes it INFINITELY easier to add wiring to lights.
Remember that most cut-in, remodel style can lights are NOT rated to be covered in insulation. Insulation retains heat, and can lights will get hot. If you are going to be installing can lights that will be in an insulated attic joist pocket, covered by insulation, you will need "IC" rated can lights. People skip or fudge this all the time, but this is legit. Cover a super hot light fixture with tons of attic insulation, and congrats, you have overheating can lights. Or, if you actually follow the manufacturer directions and keep the fixture clear of insulation, well, then you have tons of hot air bleeding up, cold air bleeding down, and potential moisture issues from the temp fluctuation.
Yup. That's part of why I don't miss doing that for a living. Trying not to put a foot through a ceiling while crawling around in an attic (especially in the summer when attics are like 130 degrees, at least), getting a million fiberglass hairs all over you so you itch forever, sometimes having to crawl along two joists on your stomach so you can try fishing a wire down on an outside wall in the ">" of the roof pitch...fucking /wrists.
Just to make it easier to walk in the attic?
If it's not a prefab/engineered truss home (doubt it would be at 50yrs old, but whatevs) I'd imagine anything that's 1/2" or thicker. 3/4" plywood might be overkill, though. OSB is probably a cheaper alternative if you want to do a larger area, though I'd go with plywood myself if I had the $$$ to burn. I also think you can find some tongue and groove wood that's on the cheaper side, but probably more expensive than OSB, I'd suspect. But this is assuming you're wanting to run perpendicular to the joists; if for whatever reason you want to run the length of a single joist pocket, you might want to go heavier, or frame some supports crosswise underneath the flooring, the length of that pocket.
Mmmm...kinda. Depending on your POV, you may want to skip to the TL;DR part below
Electrician answer:
part of it is trying not to put too many can lights on a single circuit, which can be tricky for a homeowner to figure out. Normally you want to do some napkin math on what your ballpark lighting load is. Since we're talking 120v, a single 60w incandescent is going to draw 0.5 amps. If you have a dedicated lighting circuit just for recessed lights, you could hypothetically run ~30ish can lights, but 1) you never want to really use 60w, because future homeowners could install 120w bulbs, and 2) I never really liked to push the limit on circuits, for obvious reasons. If you calculate it at 120w per light, then you're down to 15 cans, and I might personally go to no more than 10 can lights. 10amps is still a pretty decent load on what is probably a 15A circuit, and homeowners don't normally have to consider this, but lights can (should) be considered a 'continuous' load, so pushing your circuit ampacity isn't a fantastic idea (IMHO). It's also not approved of in the NEC, but that's not something that homeowners usually need worry about. 80% of a 15A circuit is 12A, but why even push that limit? FWIW, 'continuous' is 3hours or more of operation at a time, and we all know that most people leave their lights on for more than 3 hours. In a practical sense, if I was ever planning out a lighting circuit and I got close to 12A, I'd just add a 2nd circuit to split the lights and call it a day. It isn't worth doing load calculations and upsizing conductors in Residential.
But it's harder when you're a homeowner and you have no fucking idea how an electrician wired your home, originally. 50yo home? A lot of it is is probably under-wired. You will probably end up with too much on a single circuit, because 50 years ago the loads were so much less. I've seen entire 2nd floors of homes on only 1-2 circuits, whereas I used to run at least 4-5 circuits in newer homes. Unless your home has been remodeled since then, and circuits were added.
TL;DR: if you're just adding a few here and there, and the bulbs are relatively small (I think Lanx
just added 3 or 4 can lights himself) you're probably fine. But if you're thinking about adding 20 can lights then you might want to pare back that number or add a circuit. (I know it sounds crazy, but I've literally seen people add 30+ lights to a circuit when remodeling their dream kitchen themselves, and then they couldn't figure out why their breaker wouldn't hold, LOL)
Now, if your talking about 'too much' in other terms, you can have it 'too bright', where you regret it afterwards, but it's really hard to tell until they're installed. For most kitchens, I'd say that 5 can lights is probably enough. Anything over 10 is "For the love of God...why?!?". Unless we're talking about mini-cans or something.
Other things to remember: you will be restricted by framing to a certain degree. If you have an attic space above, you can scope that out and plan accordingly. Otherwise, get a stud finder and try mapping out your joist pockets for where you can actually fit the can lights. Also, attic space above makes it INFINITELY easier to add wiring to lights.
Remember that most cut-in, remodel style can lights are NOT rated to be covered in insulation. Insulation retains heat, and can lights will get hot. If you are going to be installing can lights that will be in an insulated attic joist pocket, covered by insulation, you will need "IC" rated can lights. People skip or fudge this all the time, but this is legit. Cover a super hot light fixture with tons of attic insulation, and congrats, you have overheating can lights. Or, if you actually follow the manufacturer directions and keep the fixture clear of insulation, well, then you have tons of hot air bleeding up, cold air bleeding down, and potential moisture issues from the temp fluctuation.
I would thumbs you up way more than once if i could, thanks for the info!
Likely I wouldn't be pushing even your max cap suggestion of 15 per circuit. I was thinking 3-5 for kitchen (the OG owner put a can over the kitchen window illuminating...outside.) and 6-8 for family room.
Kitchen would be the easier install because the attic space is just after the attic entry point and I can "Stand" in the space.
Family room would be a harder install because the ceiling is arched and one of the sides is almost directly under the roofing boards (clearance for fiber insulation between the joists).
Thanks for the information on the insulation though, I feel like the last owner did some...funky...things with insulation and I'll need to correct it in the not too distant future.
yea i installed 4 can lights, i just grabbed the power from the main kitchen light fixture, they're the new low profile led type
the remodeled ones look like this
and they look easy enough to install as well.
i was always looking to add LEDs, never halogen or other types, the thin LED i got just happen to go on sale and is half the price of getting the remodeled cans + led light fixures/covers.
and yea as with this stuff Erronius
got us covered w/ the IC mention. mine in particular don't say IC or not, i'm guessing cuz it's one of those whacky chinese companies. In any event, i'm gonna put a cover over the lights and then refill it with insulation.(over and around) it's already caulked too.
i was looking to add 6in actually but the 4in works fine, the kitchen is small anyways.
To be honest, it's been a while since I did a lot of remodeling work. It used to be that you either had to choose between an IC can that had a lower wattage rating, or LEDs...but the LEDs used to be enough that people would balk at the price. And people want ALL THE LUMENS, so it wasn't uncommon to have people buy non-IC and give zero fucks about it. But now, going through the Home Depot site...so many LED cans...I'm really surprised.
But now you can get a 10W LED IC 'can' for $30? That's actually kind of impressive, really.
yea thats why i jumped on the amazon lightning deal it was 8bucks a led can, i'm interested in putting a dimmer switch i don't see how that can happen since
it's on a 4 gang thing like this
and its wired 2 way, since thats also the light to flick on when you enter from garage to kitchen. so i think i'll just leave it. like you said, we just want all the lumens, and since the kitchen is my area, i just want it fucking blindingly bright. (girls are the ones that want the dimmer anyway imo)
did you see the pics i posted on my kitchen w/ just 4 lights? they're nice and bright, honestly i "could" throw in the other 2 lights, but it'd be too much.
I used the middle light switch as reference and measured, then I used the rafters for alignment and poked my screwdriver through, went down and used a card board template with hole and Drew and cut with saw. Then I caulked each one.
Also patched the big ass hole I made a year ago, heh
did you see the pics i posted on my kitchen w/ just 4 lights? they're nice and bright, honestly i "could" throw in the other 2 lights, but it'd be too much.
Checked it out just-in-case I missed it but honestly it just does more for me to see an animation of effect rather than an on / off.
Good to know though, one video I was hitting on was talking about 3 feet from walls 2 feet from top of the cabinets for best effect. I'll likely do that in my kitchen for now, goal is to break down a couple walls but I wanna do some more research on structural reinforcement before I tackle that one.
for reference: (SQ Ft is off as well as that wall marked in red...1st forray into using this software before we moved in and I haven't had a chance to fix it)
My goal is to see if I can reinforce the ceiling joist (?) that runs from south to north between kitchen and laundry and dining and family room ( they aren't 2 different ones, my planning skill sucked, they are one in the same). If I can reinforce it at the blue circles then I can bust down the walls between kitchen and family / laundry and family (there is a pass thru at the dining to family area) and make a very open family / dining / kitchen.
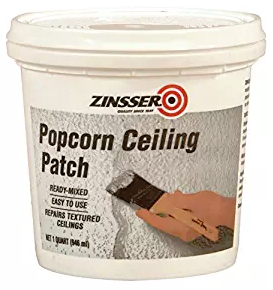
yea dude, i was measuring and shit, but you really can't see what joists and shit will be in the way until you're up there, so my first can i just went up there, measured from the middle and jabbed my screw driver down, then i went back to the kitchen, it looked good and i attached a 3in cardboard template through the screwdriver and used a drywall saw. i did have one bad screw driver drill down, but apparently popcorn ceiling is easy as shit to patch.
so i didn't worry after that.
from there i just guesstimated how much i wanted and if a ceiling joist was in the way or not, no one is gonna look up at your ceiling anyway unless it's a home inspector or a little morning romp with the wife.
i read some reviews that ppl complained about "dark" areas, but i didn't see none of that, the only areas that are dark are the overhangs. But i'm sure if you have like can lights like 10ft away from each other, you'll get some funky shadows.
yea thats why i jumped on the amazon lightning deal it was 8bucks a led can, i'm interested in putting a dimmer switch i don't see how that can happen since
it's on a 4 gang thing like this
and its wired 2 way, since thats also the light to flick on when you enter from garage to kitchen. so i think i'll just leave it. like you said, we just want all the lumens, and since the kitchen is my area, i just want it fucking blindingly bright. (girls are the ones that want the dimmer anyway imo)
Mmmm...4 gang really doesn't matter much, unless your side-to-side clearance is tight already, or you're close to your max fill (and I doubt homeowners are gonna do cubic inch calcs, LOL). Basically, if you can replace your switch and fit it in there...you're fine. But they can be a bit like a GFCI in size, so sometimes they're a bear to get to sit in the box straight. Especially if there's a bunch of wiring behind them, sometimes the switch will twist to the left or right at the device screw, and will look bad.
When you say 2-way, I'm assuming you mean 2 switches controlling the same light. [pedantic] that's just a 3-way switch[/pedantic].
But you can def get a 3 way dimmer. Either one dimmer in one location, with just an on/off switch in the other, or a dimmer control in each location.
Also, if you're wanting to dim LEDs, your standard old fashioned dimmer isn't recommended. There are LEd rated dimmers.
ALSO (I want to mention this because I know this forum is nerd-heavy and people like the fancy home automation stuff) there's a ton of fancy remote LED lighting controls out there right now. If you go with something like the HUE bulbs & bridge, the controls are wireless between the bridge and the bulb itself...but you use regular switches. The wireless receiver gubbins are INSIDE the HUE bulbs.
But there are other ways to go...for example, there's a number of switches that are wirelessly controlled (but still fed line voltage), and then controls a REGULAR LED bulb. So instead of the controls being inside the bulb, they're inside the switch. I also think that there are some product lines that don't require any sort of hub, like I believe the HUE setup does.
So either the switch, or the bulb, is what actually interfaces wirelessly (via zigbee or whatever). BUT NOT BOTH. You will get really odd results if you have a 'smart' switch trying to control a 'smart' bulb, because usually they're from two different schemes and aren't meant to work together. (ask me how I know!)
thats good to know, yea i read on the amazon comments ppl got some other recommended led dimmer, idk why, but i guess the way lights and shit and how dimmers work to do some weird resistance to actually dim(which you'd know), vs led just on/off???
First $50K paid and demo of second floor of house starts this week... Cannot wait to see this project get done. Hoping to be back in the house early March.
I won't lie that living in a 1000sqft Apartment isn't relaxing after owning a home for 5 years.
I have tried a lot of things including the suggestions in this thread...none of them beat Bar Keepers Friend. I do all my first floor windows too as they get hit with sprinkler water in the summer. You spray a little water or vinegar on the glass, sprinkle the powder, then scrub/wipe. We have extremely hard water where I live and it works great. It’s also cheap as hell.
There are spray versions and gel versions but I haven’t even tried them, the powder was cheap, easy, and effective enough I didn’t bother.
OK, so a VERY late follow up... I am wrapping up the exterior of the garage redo I started months ago now. A VERY rainy fall in Dallas made it where work slowed to a snails pace as I didn't feel comfortable doing the work with damp wood, or the exterior with damp HardiPanels. But now done with the stud replacement and new exterior skin (HardiSiding).
First, I should have put an avatar bet on the garage falling on me as it actually didn't. But when all was said and done I ended up replacing around 80% of the studs in the walls of this 20x20 detatched garage due to carpenter ant damage. This included the ENTIRE back wall except for one corner stud. I had to build a frame segment, jack up an area of the roof an inch, put the temp frame in. Then I would cut out and replace all the vertical studs. (I also had to replace around 1/2 of the bottom sill plate, and around 9 ft. or the top sill plate in one corner.) Then remove temp framing, and do another section.
Lessons learned so far
My new favorite tool is a 21 degree framing nailer. Both for the framing and that it made the new siding panels go up fast.
My wife, the lovely Mrs. Haus
, doesn't like helping me move 4x8 concrete board panels into place because I was too cheap to hire a guy from outside Home Depot...
My wife was also betting on the building falling on me at some point apparently. heh
Hardest part was correcting the 3-4% lean the building picked up, hardest part of that was removing the stakes from the ground when done....
Seeing how many studs I had to completely replace in the end I was kinda shocked the building hadn't collapsed at some point.
I still hate painting, even with a paint gun.
My old ass should have overcome my cheap ass and paid someone to do a lot of this..... But it was strangely therapeutic to do the work.
Left to do :
All the interior walls in OSB instead of sheetrock to add more lateral shearing stability and avoid this thing leaning again....
Redo the exterior lighting, and add a couple exterior outlets (before OSB goes in)
Replaced a nonstructural rotten 2x10 under my back door and put some soffit over it to hide it. It’s rough but I’m hoping the abuse and the muddy water I’m gonna splash on it to stain it will make it look not-brand-new.