3d Printing and the Future of Piracy

Kais

<Gold Donor>
849
1,526
I turned it on! Nothing blew up!

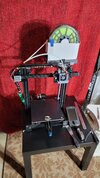
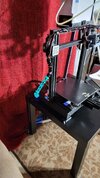
Bit of trouble getting the firmware flashed, but it got sorted. Imported my config with the correct pin mappings and fixed the config error popups. Tomorrow i go through and test each component - endstops, fans, heaters, and motors last. Checking voltages and function. Motors last because if an endstops fails to trigger from a bad crimp i haven't caught and the motors fly in the wrong direction something could break. Anyways, all temps are accurate and stable! See! Interface! Shiny!
Untitled.png
 
  • 4Like
Reactions: 3 users

Hekotat

FoH nuclear response team
12,025
11,486
Printer had to get packed up for my upcoming move sadly, so I've picked up a Meshilicious for something to tinker with in the meantime.
 

Kais

<Gold Donor>
849
1,526
After much fiddling i have completed my first print! Klipper is really explicit with it's bounding box, and setting up a z-endstop point outside the print area on x, y, and z was more difficult than expected. By default the firmware assumes that the z endstop is Z=0 even though the pin is 3mm above and 6mm to the rear of the print area. The Z offset was especially tricky and needed more than a few rounds of 1-layer 20mm cubes in grids across the entire bed each with a descending -0.01mm z_offset_adjust to get the layer height right. I went from piss poor adhesions to solid adhesion and no gaps between the lines after 36 samples. Now that i have first layers down my next print i canceled because the slicer profile was set for default abs with no part fan. The print was melty and curling bad. I'm in an enclosure now so 40% fan after layer 4 and boom. I'd say this looks damn good with absolutely no tuning of the extruder, pressure, resonance, etc. I can see under extrusion and resonance in this print so even better prints to come!
First Print.jpg

Now that Klipper knows my explicit bounding box and all endstops and the inductive probe are calibrated to within 0.0025mm range (essentially the inaccuracy inherent in the switch contact) I enabled Bed Mesh. After heat soaking the bed at 100c for 30m i ran a calibration to generate a map and see my surface flatness. 6mm cast aluminum machined plate, magnetic sheet, double sided spring steel sheet with textured/smooth pei. 0.063mm variance form low spot to high spot. That's pretty fucking flat.
heat map.png
 
Last edited:
  • 2Like
Reactions: 1 users

Hydromarty

Vyemm Raider
490
3,605
This is my "full travel" cable management

Kinda funky

Ender 3 V2 MircroSwiss DD
 

Attachments

  • 20220320_131815.jpg
    20220320_131815.jpg
    1.9 MB · Views: 27
  • 20220320_131838.jpg
    20220320_131838.jpg
    1.9 MB · Views: 27
  • 2Like
Reactions: 1 users

Hydromarty

Vyemm Raider
490
3,605
If you have $100 and the patience for assembly and set up, the ender 3 pro is worth every penny, so far. I got it for 100 from microcenter with 100 off email coupon. I can find a link to the coupon anyone wants.
 

Attachments

  • 20220323_181528.jpg
    20220323_181528.jpg
    2.3 MB · Views: 25
  • 2Like
Reactions: 1 users

Hekotat

FoH nuclear response team
12,025
11,486
Finally moved in, got the printer reassembled and used a torque wrench on the bed plate. This really helped with leveling issues I was having on one side of the bed.

My prints haven't been looking well lately and I think it's the extruder, I went ahead and picked up a Capricorn tube and a Micro Swiss all metal extruder upgrade.

Looking forward to diving back in.
 
  • 3Like
Reactions: 2 users

Hekotat

FoH nuclear response team
12,025
11,486
I got the Capricorn tubing installed as well as the new all metal extruder.

Same motor but now e step calibration changed almost 3 fold. I'm wondering if this was my problem and filament was jamming in the oem tube.

I need to relevel the bed one more time then start prints this weekend.
 

Bandwagon

Kolohe
<Silver Donator>
22,720
59,536
Can anyone help me out with a recommendation? Coworker wants to buy her husband a 3D printer and asked for input from me. I told her I haven't touched one in about 5 years, so I'm on waaaay outdated info.

From her:
Thanks! I figured with all your projects you would be the person to ask. Ideally, I'd like something under $500, but willing to consider up to $1,000 for the right machine. He runs lasers at a metal fab shop and definitely likes to fix and create. Not sure why he needs a 3D printer when he can cut all sorts of fun stuff out of metal, but he loves gadgets!

I told her:
Sounds like he'd be capable of making use of a lower end one if it threw him any curveballs then!
Honestly though, I'd just get him a gift card towards the purchase if he's already been looking at them a bit. He probably has specific uses and features he's interested in, depending on what he's trying to make. If I were in his shoes, I'd rather get a little help towards the thing I already decided I wanted, vs being gifted something that may or may not do everything I want. Just my 2 cents, but I'll still ask for updated recommendations in that price range. I'll get back to ya!
 

Hekotat

FoH nuclear response team
12,025
11,486
Can anyone help me out with a recommendation? Coworker wants to buy her husband a 3D printer and asked for input from me. I told her I haven't touched one in about 5 years, so I'm on waaaay outdated info.

From her:


I told her:

Shoot for something with auto-bed leveling and I highly recommend a prusa mk3. I've only had creality and they take a lot of upgrades to get them to the same level. I'm just waiting on the XL so I'll finally have a high end quality printer.

Manual bed leveling is so tedious and time consuming it can drive lower skilled people away quickly. Prusa is probably your best bet under 1k.
 
  • 1Solidarity
Reactions: 1 user

Hekotat

FoH nuclear response team
12,025
11,486
I'm having hell with my printer since this extruder upgrade. First 1/4" prints great then it gets really furry. I don't think it's stringing but it could be, I'm trying to find just one picture similar to mine to see what the hell is going on, but I'm pretty sure it's something with retraction settings.
 

Kais

<Gold Donor>
849
1,526
Check the feedpath to see if there are plastic shards on the extruder gear. If so, bump your temps up because your getting extruder skipping since it cant push the plastic through the nozzle fast enough. Have you done a pid tune on your hotend yet? Pretty frequent among folks swapping out hotends is getting the temps right vs your old settings.
 

Hekotat

FoH nuclear response team
12,025
11,486
Check the feedpath to see if there are plastic shards on the extruder gear. If so, bump your temps up because your getting extruder skipping since it cant push the plastic through the nozzle fast enough. Have you done a pid tune on your hotend yet? Pretty frequent among folks swapping out hotends is getting the temps right vs your old settings.

I didn't make any changes to the hotend since the move, just an extruder upgrade.

I'll check into the PID tune.
 

Kais

<Gold Donor>
849
1,526
Oh, i must have misread. Hmm. You running direct drive or bowden? DD should have a retract distance of less than 1mm. Bowden setups between 3-5, to accommodate slop in the tube. Have you calibrated your extruder steps? It's usually a process of measure and mark 100mm on your filament, send a command to extrude 100m filament, then measure the actual distance against the mark do some math and input the new value. The old extruder motor may have had fewer steps and so you're under extruding and not knowing it.

edit: went back a few pages and saw you have a cr6 max. Direct Drive. Yeah pid tune is to stabilize temps of the hotend by calibrating the heater response. That was the wrong call, though still a good thing to do on any printer.
 

Hekotat

FoH nuclear response team
12,025
11,486
Oh, i must have misread. Hmm. You running direct drive or bowden? DD should have a retract distance of less than 1mm. Bowden setups between 3-5, to accommodate slop in the tube. Have you calibrated your extruder steps? It's usually a process of measure and mark 100mm on your filament, send a command to extrude 100m filament, then measure the actual distance against the mark do some math and input the new value. The old extruder motor may have had fewer steps and so you're under extruding and not knowing it.

edit: went back a few pages and saw you have a cr6 max. Direct Drive. Yeah pid tune is to stabilize temps of the hotend by calibrating the heater response. That was the wrong call, though still a good thing to do on any printer.

It's a bowden tube, just upgraded to all metal. I'm not ready to try out direct drive yet.

I recalibrated and it was off a shitload but maybe something is wrong. I'll check it again.
 

Hekotat

FoH nuclear response team
12,025
11,486
Finished this up today, getting closer to perfecting the top skin for a flawless look.

Turns out the part I was printing was causing all my issues, that was a waste of 2 weeks.

vivaldi_USt3QeLgaR.png
 

slippery

<Bronze Donator>
7,892
7,704
Finished this up today, getting closer to perfecting the top skin for a flawless look.

Turns out the part I was printing was causing all my issues, that was a waste of 2 weeks.

View attachment 410465
I'm guessing those are 120mm fans, but I can't tell. I feel like Unifans would be great here for cutting down on wires, and making it easier to secure in place.
 

Hekotat

FoH nuclear response team
12,025
11,486
I'm guessing those are 120mm fans, but I can't tell. I feel like Unifans would be great here for cutting down on wires, and making it easier to secure in place.
92mm slim fans. I could have gone a few different routes but I had plenty of Noctua fans laying around and I didn't want to spend money I didn't have to.
 

Hekotat

FoH nuclear response team
12,025
11,486
Just a friendly reminder that if you're having hell getting your printer dialed in try a different file. I just wasted two weeks of my life trying to get everything just right and it was the file the whole time.
 
  • 1Thoughts & Prayers
Reactions: 1 user

Hekotat

FoH nuclear response team
12,025
11,486
3D Printer tool tray complete. Just need to make the backside brackets now.
 

Attachments

  • Screenshot_20220515-103624_Gallery.jpg
    Screenshot_20220515-103624_Gallery.jpg
    1.3 MB · Views: 22
  • Screenshot_20220515-103636_Gallery.jpg
    Screenshot_20220515-103636_Gallery.jpg
    1.2 MB · Views: 21
  • 2Like
Reactions: 1 users